
Marcus Colello has been creating fantastical worlds in his mind since he was young. Now, he’s building them in 3D using Maya and Unreal Engine!
We asked Marcus to tell us about his artistic journey in 3D modeling and world building, and walk us through how he made the fantastic virtual set, Forgotten Crypts, his final project for the 3D Modeling Specialization Course at CG Spectrum, with the guidance of his industry mentor Shaun Stephenson (Splinter Cell: Chaos Theory, Star Wars: The Force Unleashed, Open Season).
What inspired you to get into 3D modeling and world building?
I’ve always had a very active imagination. Since I was a child, I have always been a big fan of fantasy and loved anything that took me to far-away lands. I would often play games that took place in worlds of my own creation. My friends and I would run around with wooden sticks pretending they were swords and go on epic adventures in the woods. Other times my friend Elliott and I would make up card games similar to Pokemon or Yu-Gi-Oh!. I often mixed my ideas based on the Warhammer models and books I collected.
In 2007, I went to an art show with my cousins in LA, and an exhibit for a visual effects school caught my eye.
I realized there were actual jobs in the creative industry outside of things like graphic design and traditional art.
I was so motivated I bought a bunch of computer parts with my savings at the start of 2008 and built an absolutely absurd computer for the time. I, unfortunately, didn’t use it for much outside of playing games like Crysis, World of Warcraft, Runescape, Warcraft 3, and Diablo.

For about the next decade, I worked in the hospitality industry and as an alcohol and drug counselor at an inpatient rehab. During that time, I thought about all the things I enjoyed when I was younger and made a list. It contained movies, animated shorts, anime, video games, computers, animals, nature, geology, and art. I then remembered the visual effects exhibit, and I wondered what other schools were out there for 3D.
I decided to continue researching jobs and schools in the 3D industry. In the meantime, I took about every art class possible at Monterey Peninsula College to prepare myself for a deep dive into the world of art and technology. Eventually, I discovered The Rookies and reached out to numerous alumni from different schools to see how they felt about the education they received. CG Spectrum was one of the schools that stood out the most.
I finally decided it was time to venture out on a long journey, way out of my comfort zone, into the world of art and entertainment!

Close up of the 3D modeled wall from Marcus' environment, Forgotten Crypts
You’ve completed three courses now at CG Spectrum! Tell us a bit about your experience here.
When researching schools, I was looking for a program that would teach me a little bit of everything that might help me build my own virtual worlds. The Foundations of Game Art & Animation Course seemed to fit the bill perfectly.
CG Spectrum's one-on-one mentorship was a big draw-card. As someone who was pretty rusty with technology and new to studying art, having the guidance of an industry professional was imperative to my learning.
I have difficulty learning things that are more technical and get very off track looking up every little thing I find interesting when I don’t have a well-structured program. The mentors helped me to stay on track and save time sifting through a lot of unhelpful material, videos, etc.
I learned more from my mentors than I have from any other course. I also found the CGS Slack community to be very active and helpful.
After two weeks of study with mentor Simon Warwick, I was completely sold that CG Spectrum was the place to start my journey into the world of CGI.
I would say the biggest lesson I learned would be to stay focused but, at the same time, to ensure you still interact with the people learning around you. Although I feel the one-on-one mentorship was great for my personal learning, I wish I had been a bit more social in the Slack community and used my time at CG Spectrum to build more connections with my fellow students.
Tell us about Forgotten Crypts, your final project for the 3D Modeling Specialization Course
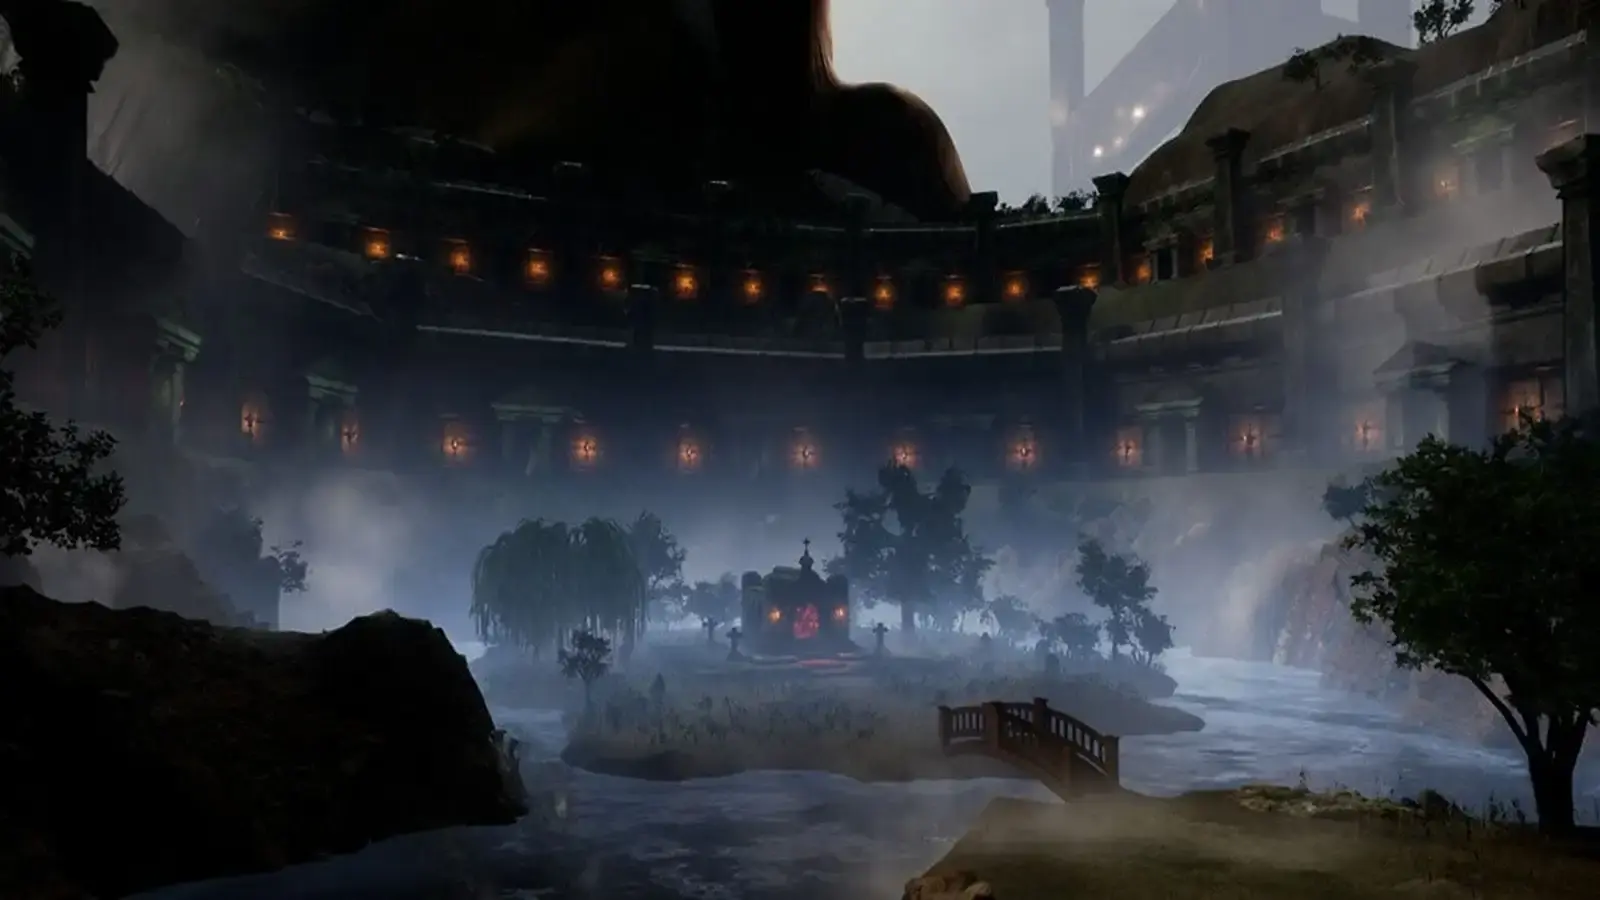
Exploration of Forgotten Crypts, the 3D world built by Marcus
1. Block Out and Brainstorming
I started my project after stumbling upon a couple of videos of someone visiting Highgate Cemetery In London. I saved the videos to use as reference later and began blocking out what, at the time, I thought I might be able to accomplish in just under three months. By the end of it, I had a very rough landscape block out with some ideas drawn out on it.

Rough landscape block out by Marcus
Highgate cemetery video reference
2. Real World Location
The next step was searching for a real-world location that I thought would be good for my initial concept. I did this in hopes of better grounding my project in reality, even if it was ultimately a fantasy project. I eventually landed at Watkins Glen State Park in New York and an image that I was particularly drawn to.

The image of Watkins Glen State Park that inspired Marcus
I originally wanted to implement a mossy cliff side and waterways cut out of limestone with lots of dripping water and small waterfalls. (I would later find out that the scope of my project needed to be significantly reduced if it was to be completed in the allocated time frame.)
Next, I viewed the park on Google Earth and searched for the area in the above image.
I researched ways to save time by generating a landscape from a real-world location and eventually found videos on how to use Tangram Heightmapper.
YouTube tutorial by Ben Cloward that Marcus used to guide him with generating a real-world height map from Google Maps

The terrain Marcus generated using Tangram Heightmapper
3. Gathering Reference
Next, I began gathering reference images and creating a reference sheet using PureRef. This stage technically started when I found the above image for Watkins Glen State Park and continued throughout the project. Most of the imagery below was gathered at this stage.
PureRef makes using reference images easy by keeping them all in one place and having hotkeys for zooming in and selecting images (using the space bar). I typically organize things by category using note boxes (CTRL+N), although I did not feel the need to do so on this project as I had fewer images than usual.

References images Marcus collated using PureRef
4. Implementing scanning technology

When I saw this car (above image), I really wanted to have something similar in my scene but decided that modeling it would be too time-consuming. In the past, I had taken 3D technology classes at Monterey Peninsula College and had just started to work as a part-time lab tech at the school. The 3D technology instructor's name is Gary Quinonez. He is an amazing teacher and provided me with help and access to the lab equipment.
I tried to incorporate what I had learned about scanning with what I had learned at CG Spectrum since I had access to several scanners.
I began searching for an old car with a similar look and eventually landed on a 1934 Ford Coupe. I then purchased a 1/24 scale model of the car from Amazon for around 30 USD.

The car model Marcus purchased for scanning purposes
I ran into several issues while trying to scan the car due to the overhangs caused by the wheels and the hood of the vehicle and the glossy surface reflecting the light that a structured light scanner uses to generate a point cloud. I had to disassemble parts of the car and scan them separately using clay to hold pieces in place.  To handle the reflectivity issue, Marcus ordered AESUB orange and blue to spray the car's surface.

Scan of the model car in SHINING 3D.
I did a total of 16 scans on the main car body and around 4-6 for the top of the car using the Einscan SP. I then used SHINING 3D to generate a watertight mesh and sent it to ZBrush for a ZRemesh and quick retopology.
A short video of the car being scanned on the Einscan SP (Marcus apologizes for the phone video quality)

The end result of Marcus’ car.
After that, I imported the car into Maya and created UVs prior to doing some quick texturing in Substance Painter. Then it was ready to place in the scene.
5. Landscape and Crypts
I continued to sculpt out the landscape in order to have it better fit the concept I had in my mind. I began looking up videos on how to create landscape materials and filtered through quite a few before finding two videos by Unreal Sensei on YouTube: How to INSTANTLY TEXTURE your landscapes in UE4 and How to HIDE Texture REPETITION in Unreal Engine.
My landscape changed quite a bit from the original auto-generated heightmap landscape I started with. I combined Megascan materials using the techniques from Unreal Sensei’s video and some hand painting.
 The results! 3D environment created by Marcus. You can also get a good idea of how much he ended up scaling back the scope of his project.
 Another angle of Marcus' virtual world
The landscape was originally too repetitive. Shaun Stephenson—who is an absolutely amazing mentor and very talented artist—guided me through how to break up the repetition using the foliage tool editor with custom parameters to add height variation to the grass, mushrooms, and shrubs.
I also added a cliff face with a mysterious tower in the back to break it up and add some variation and ambiance. I then added fog and cliff highlights to add a greater sense of depth.
 Marcus added fog, mysterious towers, and cliff highlight
The crypts were several assets put together into a blueprint in order to make placement easier throughout the scene. The columns served to add further visual interest to their structure. They also provided flexibility when placing the main crypt blueprints to hide any resulting geometry seams that occurred from the natural placement of the crypts, based on the topology of the organic nature of the landscape. The torches were a separate blueprint that contained a hand-modeled mesh and fire and smoke effects from Unreal Engine Marketplace as well as Unreal Engine point lights.
The crypts were built using modular pieces. The upper section utilized gold and charcoal surface types to signify a higher societal echelon, while the lower part used brass and simple stone. I had to go through several HDRI images before finding one that suited the mood. I went with a skybox mesh from the Elite Landscapes pack from Unreal Marketplace.
The ‘dragon carving’ on the crypts was done with the help of the new Bas Relief function in ZBrush and my previously sculpted dragon model for CG Spectrum’s 3D Modeling Course.
The tutorial by Michael Pavlovich for the carving result Marcus achieved with the Bas Relief function

The end result of the dragon carving
6. Megascans
For my project, I wanted to try to utilize every type of asset at my disposal, including Megascans, custom scans, hand-modeled assets, and marketplace assets. I had never really used Megascan assets before this, so I began looking into installing Quixel Bridge and the Megascans plugin for Unreal Engine 4. I found a YouTube video on how to install a Megascan plug-in by Scorpion Venom, which helped greatly.
My project would not have gone as smoothly without my CGS mentor, Shaun’s guidance. When I ran into problems, he was often able to help find me a solution immediately or in a much shorter time frame than I was able to do on my own.
I believe that learning from people who’ve been actively working in the industry for years has been paramount to my growth and is part of what makes CG Spectrum such an amazing school.
7. Master Material
One of the simplest and most useful steps Shaun taught me in a previous term was using master materials in Unreal Engine to save time.
I added attributes to master material in order to give me adjustable parameters that ultimately provided more control to make changes and tweak my look-development process in real-time.
I added a multiply to the red and green channels to boost the normals and ran it back into a float to reassemble it prior to plugging it into my shader. I had one mask texture with compression settings set to Masks (no SRGB) to save memory; the red channel contained my ambient occlusion, blue contained metallic, and green contained roughness. Each channel contained parameters to increase or decrease the values of the channel contents separately in real-time as needed.

Masks and channels
I added an opacity option that could be enabled/disabled for shaders with opacity maps as well as a diffuse power parameter using a multiply node. I did the same thing for my emissive map.

Master material
8. Rain
To create the rain, I used a tutorial by Dean Ashford called UE4 - Tutorial - Rain Particles [Cascade]. I then tweaked the parameters to dial the rain to a density and speed that I liked. The main problem I was having was that my map was so large, and the number of different particles I would have to scatter around my scene to keep it raining was going to be really expensive.
With the help of my mentor, Shaun, we figured out how to attach a localized rain particle effect to the character blueprint so it would follow the character around without needing to overdraw particles across the entire environment.

Localizing the rain particle effect
Particles, Effects, Fog, Water, Trees, and Sounds
The dust, water, fire, smoke, nature, river, and water sounds I used were all from various free packs and demos on the Unreal Marketplace. The trees and sounds were from the CityPark Demo. The portal effect was an edited version of a preexisting one from the AdvancedMagicFX13 pack, and the fog was inspired by a tutorial on the use of Exponential Height Fog.
I always download all of the monthly free assets on Unreal Marketplace. Most of the marketplace assets in my scene came from these monthly giveaways.
What challenges did you have along the way, and how did you overcome them?
The biggest challenges were lighting, attaching the particle system to my character, and reducing the scope of my original project idea.
More general challenges include: learning to concentrate on one area and polish it; time management; learning which objects I could get away with using from asset marketplaces as opposed to making myself; and getting marketplace assets and Megascan assets to sit well with assets I created for it to be believable that they all existed in the same world.
This is why we decided to add parameter adjustments for every shader so we could match it in post. (See above master material breakdown.)
 Still from Marcus' Forgotten Crypts virtual set
What are your career goals?
I hope to spend 4-5 years working at a studio as an environment artist using Unreal Engine and learning from others while expanding on one of the worlds I am creating in my free time.
My end goal is to open my own studio one day so that I can bring my own worlds to life.
What kind of roles are you looking for in the future?
Creative Director, Environment Artist, and Game Developer.
Anything else you would like to add?
There is always more to learn! Art is an endless journey, but that is what makes it so exciting!

Check out more of Marcus' work, like this one, on his ArtStation or Instagram, and follow his career journey on LinkedIn.
Thanks to Marcus for sharing his comprehensive world building process with us! With the help of his mentor, Marcus showed incredible initiative—going above and beyond his assignment requirements—and learned some really valuable techniques along the way. Marcus' ingenuity in seeking out and using additional 3D tools and software (many of which are free) is a great example of how advancements in technology can assist us in creating more complex and more creative worlds.
Ready to start modeling your own virtual worlds?
CG Spectrum’s 3D modeling courses help you gain the skills to build a believable virtual world. Learn digital sculpting and texturing techniques from film and games industry pros, with personalized feedback and an industry-led curriculum. Create everything from hard surface props to characters and creatures, and work towards building immersive 3D environments like Marcus'. Your career in 3D modeling is yours to mold—enroll now!

Related Links
- 3D modeling career track
- 3D modeling degree
- 3D modeling career pathways
- How to Create a Realistic 3D Character Portrait with Ian Spriggs