
Chris Farkouh, a veteran live event producer from the UK, has spent the past few months exploring the world of realtime 3D with CG Spectrum mentors Simon Warwick, Deepak Chetty and Clinton Crumpler.
Chris recently shared a detailed breakdown of his latest Unreal Engine project, Slums of Elysium.
This breakdown was originally published on Chris Farkouh's website where you can learn more about him and his diverse range of work.
Slums of Elysium is a game prototype made as part of the Unreal Engine courses at CG Spectrum College of Digital Art & Animation.
It is a project that was borne out of a structured learning path created by CG Spectrum mentor, Simon Warwick, to introduce students to intermediate level technical art and animation features of Unreal Engine for games, with additional level interactions, game mechanics, user interface, shaders and VFX layered over the top - the final result becoming an end-to-end level prototype with the utilisation of numerous features of the engine.
Download a playable version for Windows here and see the list of features and credits. For a detailed look under the hood, continue reading on.
Stage 1: Player character
The first stage, which is also one of the most complex, is setting up the playable character. Unreal Engine has a system for the creation of 3rd person characters embedded into the framework of the engine and Simon guides you through this process step by step.
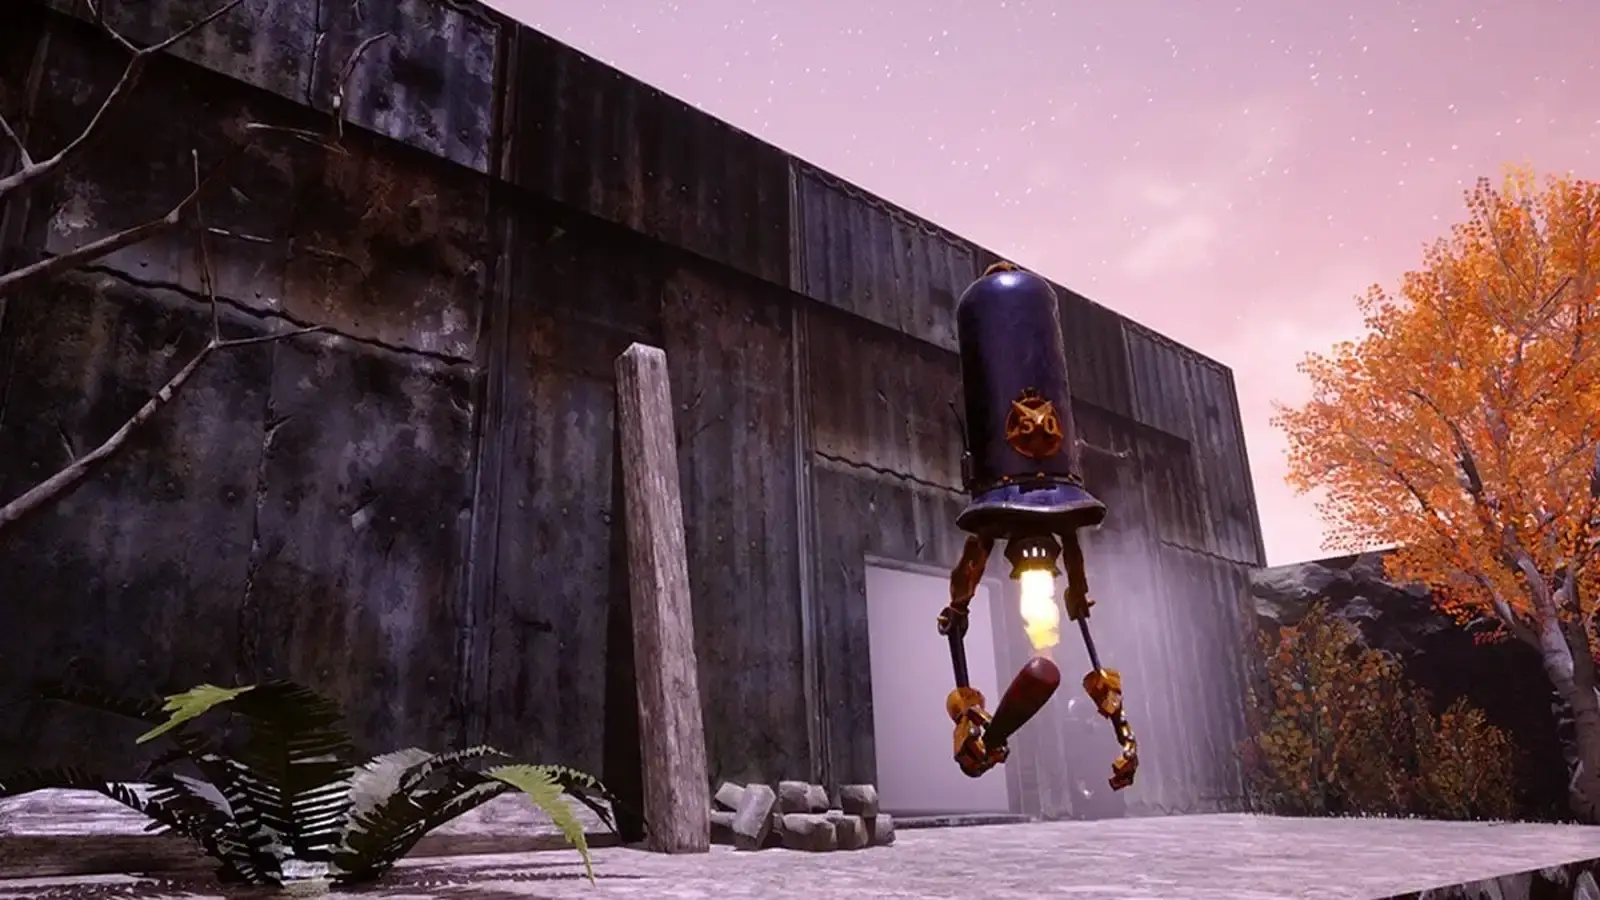
You begin by importing the skeletal mesh of the character, in this case an Android Policeman, into Unreal Engine. He also supplies a suite of animations including ‘Run, Stop & Idle’ motions.
Controller/keyboard input is defined in the ‘Input Section’ of the ‘Project Settings’, then hooked up into the character via a ‘Character Blueprint’. This provides the raw data to apply to the character so that it moves in the direction defined by the player input.
A ‘Character Blueprint’ is a specific blueprint within Unreal that binds the skeletal mesh & animations of the character, whilst having a number of exposed settings for optimizing the character’s behavior. It is within this blueprint that you also add a ‘Camera & Spring Arm’ in order to create the classic 3rd person free rotating camera ubiquitous to video games.
The input data is then manipulated to become a variable that can be transferred from the ‘Character Blueprint’ into an ‘Animation Blueprint’. For this project the character can move forward, backward, left, right and jump, and the variables required to drive the animations are ‘Turning’, ‘Acceleration’ and ‘Speed’.
The ‘Animation Blueprint’ is comprised of a graph for visual scripting and an ‘Animation State Machine’. The ‘Animation State Machine’ is used to define the sets of animations that a character can use, when they are used, and the transitions that may occur between animation sets. For this project the state machine only transitions between an ‘Idle State’ and a ‘Movement State’.
For animation sets with multiple animations that need to be seamlessly blended together (for example a walk/stop cycle with transitions from left to centre to right), these are sequenced together using a ‘Blendspace’, and the variables that were recorded inside the ‘Character Blueprint’ are transferred over to drive the blend of the animations within the ‘Blendspace’ via the ‘Animation Blueprint’. The ‘Blendspace’ for this project is referred to as a ‘2D Blendspace’ as the blend is happening on both the X and Y axis, so that the character animations can blend forwards-backwards & left-right.
The ‘Idle State’ occurs naturally when the player’s speed is zero as it will rest at Idle State 01, which is the centre point of the ‘Blendspace’. However, there is code written in the ‘Animation Blueprint’ to randomly generate an integer between 1 & 500 each ‘Event Tick’. If the randomly generated number matches a number predefined in the code (and the player’s speed is zero), then it will trigger an animation state change to Idle State 02, which is the animation with the character throwing his bat in the air and then catching it.
Jumping is simple to handle in this instance as it doesn’t trigger a change in animation (although it does trigger changes to the Thruster VFX which I will cover later in this article). Therefore the only thing you need to do is optimize the feel of the jump using the available settings within the ‘Character Blueprint’.
Stage 2: Game mechanics
The mechanics of this game are fairly straightforward. The player is required to solve navigating through the level via a series of curated interactions. The player has the ability to jump between ledges and there are coin pick-ups and interactive tasks presented along the player journey. The player will also be killed if they miss a jump and fall to the bottom of the chasm, before respawning at 1 of 3 respawn locations, which updates as the player progresses through the level.
A feature to highlight which eases you into Unreal Engine’s visual scripting system is the blueprints that underpin the coin pick-up mechanic.
The coin is a ‘Blueprint of Actor Class’ which has a ‘Static Mesh’ coin obtained from the engine starter content with a ‘Sphere Collider’ component. The coin rotates via visual scripting, with a ‘Rotation Speed’ variable applied on the Z axis.
When the player hits the ‘Sphere Collider’ it sends 1 point from the coin blueprint to a function in the ‘Game State’ blueprint, which stores the total number of points. It then plays a sound effect and triggers a VFX whilst destroying the coin itself. The reason the ‘Total Points’ variable is stored within the ‘Game State’ is because this is a feature of the engine to carry variables over even after the player is killed (i.e. it permanently stores the variable until the game is closed or restarted).
The score is updated on the player’s HUD through a ‘UI Widget’ which receives the variable from the ‘Game State’ and then dynamically displays it on screen.
Stage 3: Level whiteboxing
Now it is time to start figuring out your level. You do this by whiteboxing the level using ‘BSP Brushes’, which are a basic geometry set that is included with the engine. You can build out the general extents of the level and all the platforms, walls and doors that the player will navigate.
For the purposes of designing and building out the mechanics, triggers, flow and interactivity of your game, you will spend most of your time in a whitebox environment, whilst the art department can then prepare all the art assets based on the layout defined by the whitebox.
Stage 4: Level art
The level art for this project was derived primarily from assets within the Soul Cave project on the Unreal Engine marketplace. Using the 'BSP blockout' as a template, you populate the level with game-ready art assets and materials, swapping long wall sections with modular wall pieces and adding rocks and scatter to the environment to make a believable scene.
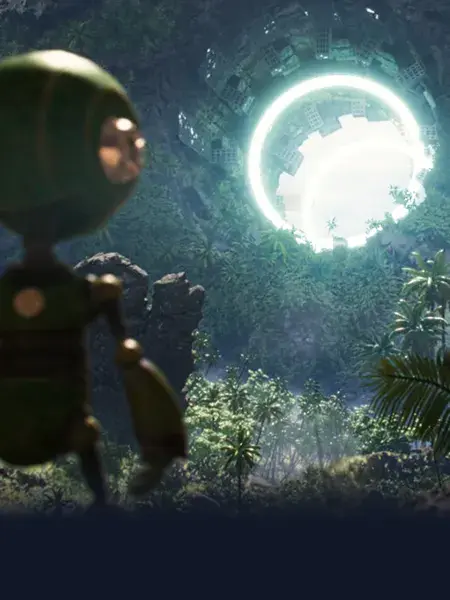
This scene is an outdoor slum built within a deep chasm with a river running by. The rock ledges lead up to a mysterious hall that opens up to a hidden cave. To increase visual breakup and interest to repeating surfaces, ‘Decals’ can be applied to the scene, allowing you to project 2D textures onto 3D objects.
Some rock materials are also set up for vertex painting, enabling you to brush in moss and a wetness effect using the ‘Vertex Paint’ feature of Unreal Engine. The project also makes use of the ‘Landscape Tool’ to build the river bed at the floor of the chasm.
Stage 5: Shaders
In addition to using the materials provided by the Soul Cave asset pack, I wanted to build some feature props in the level from some ‘Shaders’ that I made from scratch.
I researched how to build a hologramatic projection of the earth, which I applied to the statue in the cave. I then modified that 'Shader' for the large door that reveals the end of level portal.

I also planned to hide a key to that door inside a glass orb, so I used it as an opportunity to build an ‘Advanced Glass Shader’. It applies a 'fresnel' to tint the edge of the glass. An 'HDRI' is also applied to the surface to create the appearance of a reflection of the surrounding scene. It has controls to create the appearance of smearing, a variable opacity and adjustable refraction.
Stage 6: VFX
The level is peppered with VFX for a heightened experience, both hand-built and content supplemented from the Unreal Engine marketplace.
Simon introduces you to complex manipulation of VFX using the ‘Cascade Particle System’ feature of Unreal Engine. Of particular note is the thruster of the player character. This is a hand built flame ‘Particle Emitter’ that is appended to the character in the ‘Character Blueprint’. The clever aspect of this is that a ‘Thruster Power’ variable is created in the ‘Animation Blueprint’, which stores a curve value which is incremented each ‘Event Tick’ whilst the player is jumping.
The variable is transferred to the thruster blueprint and stored as ‘vector’ and ‘float’ parameters. Cascade is able to read dynamic variables exposed in blueprints, and in this example the strength of the thruster is manipulated in real time by the force of the jump.
The other keynote VFX are built using the Niagara system, which is Unreal Engine’s latest and more advanced particle system, and they are assets acquired from the marketplace. The statues in both the cave and the indoor hall have a VFX applied that dissolves the ‘Static Mesh’ using a trigger which is operated by a ‘Level Sequence’. The swirling VFX around the statue in the cave, and the portal at the end of the level are both portals within a portal pack.
Stage 7: Level interactions
What defines this project is it is a linear player experience where the player navigates through a series of gates and level interactions. As such there is a lot of visual scripting written to stop the player from being able to enter the next stage of the level until certain conditions are met.
The ‘Level Blueprint’ is used to trigger the cinematic at the start and switch on and off the HUD. There are invisible 'Trigger Volumes' throughout the level which are used to trigger specific events.
For example when you enter an area which has an interactive feature, a UI command is added to the screen to direct you to press E, this then turns off when you leave by crossing a trigger. When you attempt to open the door at the end of the level, you are directed to find a key to unlock the door. When the key is found this state changes to direct you to open the door.
The ‘Level Blueprint’ is also used to trigger the cinematic sequences midway through the game. For example, in order to open the interior hall door, you need to turn all 4 wheels. Each time a wheel is turned, not only does it trigger the lights to change color, a steam jet to play, an SFX to play (at an incremental change of pitch), it also increments an integer in the code which when reaching 4 automatically triggers the cutscene of the door opening.
Another interaction of note is the orb. When you walk up to the orb you enter a ‘Sphere Collider’ directing you to press E. Upon pressing E the ‘Character Blueprint’ triggers the orb to swap to a second version of the orb which is a destructible version built using Unreal Engine’s ‘Apex Destruction' system. It is configured so that when you collide with it once it shatters, and the second collision makes it fall to the ground and trigger both a forward and reverse shattering glass SFX, and play a flashing purple animation on the HUD. This then reveals the key which again when collided with, triggers a particle effect, SFX and a 'UI Widget' telling the player they have the key.
Stage 8: NPC AI
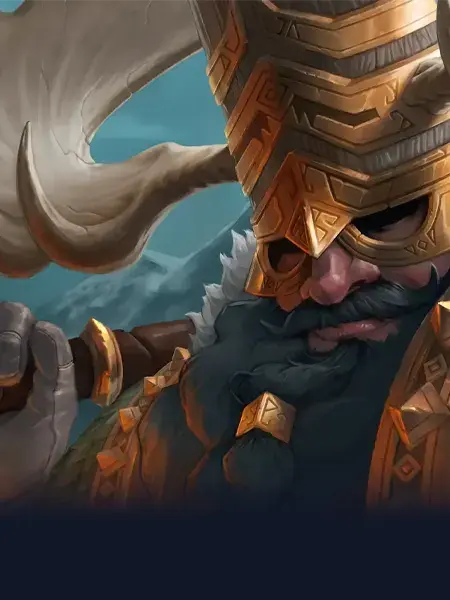
The NPC character who features in the opening cutscene and the cave is Paragon Dekker who is available on the Unreal Engine marketplace. She has a full suite of game ready animations, VFX and SFX shipped with the character.
Simon introduces you to Unreal Engine’s AI system, and the character is programmed to wander around the statue until the player is within a certain distance and field of view at which point she remains in the same position and turns to face you whilst communicating in text form.
She has a ‘Box Collider’ which when hit by the player sends a ‘Delegate’ into the ‘Level Blueprint’ to trigger a ‘Custom Event’ that changes cameras using the ‘Set Viewtarget with Blend’ blueprint function, whilst disabling the character control for the duration of the cutscene, and triggering the ‘Level Sequence’ to play.
A custom ‘Animation Montage’ was also built for this cutscene where Paragon Dekker strikes her staff with additional VFX and SFX layered on top within the montage.
Stage 9: Lighting, atmospherics & post-processing
The exterior lighting is driven by Unreal Engine’s ‘Sky Sphere’ and atmospherics system which allows you to manipulate the cloud cover, the time of day (which affects the color of the sky), brightness, direction and color of the primary light source and finely control fog using the ‘Exponential Height Fog’ actor. I selected an ethereal pink sky color for effect, lit the environment with a distinct pale lavender, and filled the chasm with a dense volumetric fog which dissipates the higher you climb the level.
The interior scenes are lit using a combination of ‘Static’ and ‘Dynamic’ lighting. The interior hall is architecturally treated - it has a perimeter of dim grazing wall light with spotlights picking out key features. Simon also introduces you into using 'IES profiles' (which is real world architectural lighting photometric data) to build your own unique light sources, as well as revealing variables to the editor using blueprints. This is knowledge directly transferable to the creation of photorealistic archviz projects. I also built some emissive buttons that change color when the large wheels are fully turned.
For lighting key objects, I tend to use a theatrical approach and adjust the color from each spotlight so as to pronounce the form and colors of the object, such as the statue in the interior hall which is lit from a 45-degree angle in a pale orange and a pale green for dynamism.
Conversely in the second room the statue is lit from behind to create a more dramatic effect. Lights in the room are mimicking the effect of flame torches or the pale lavender spilling in from the exterior.
As you enter and leave the interior rooms there is a slight god ray from the exterior light. This is actually a ‘Lightmass Portal’ blueprint which is freely available on the Unreal Engine marketplace here.
There are three ‘Post Processing Volumes’ across the level: the exterior, the interior and the exit tunnel. These volumes use the ‘Color Look Up Table (LUT)’ feature in Unreal Engine for color correction. I have taken snapshots of each environment and color corrected them using Adobe Photoshop. I have then created a ‘LUT’ which can be transferred back into Unreal Engine to adjust the color in each ‘Post Processing Volume’ to match the changes in Adobe Photoshop.
Stage 10: Cinematics
‘Sequencer’ is the feature within Unreal Engine which is used to create game cinematics, and it is what has since spawned the prolific rise of virtual production by turning Unreal Engine into an intuitive linear editing animation tool as well as the more traditional non-linear game engine. This game has 3 separate cinematics that operate slightly differently.
The opening cinematic is the classic use of ‘Sequencer’ where you drive the character animations and the movement of the cinematic cameras in a linear timeline. It utilizes a ‘Camera Rail’ for the smooth camera pan across the chasm whilst tracking the position and focus of the camera to Paragon Dekker.
The second cinematic works side-by-side the blueprint system. It triggers the statue to dissolve whilst animating the doors and playing SFX, but the blueprint system is used to move the player character’s position, disable player input and destroy the statue and the doors after the sequence has played.
The third cinematic operates in the same way however it plays the ‘Animation Montage’ mentioned earlier for Paragon Dekker. What it does differently is there is no camera inside the sequence filming the cutscene. Instead the camera blend is triggered within the ‘Level Blueprint’, and this is how it performs a blend rather than a cut between cameras. The ‘Level Blueprint’ also dampens the main audio track and plays a mysterious female vocal over the top.
Stage 11: Audio & SFX
The audio track was selected from the excellent website filmusic.io - ‘Inspired’ by Kevin Macleod. The sound effects in the game came from freesound.org. I created two ‘Sound Classes’, one for the music and one for the SFX. Then when you import the .wav files into Unreal Engine you convert them to ‘Sound Cues’ and assign them to one of the classes. This becomes relevant when you want to create a slider in the user interface to change the volume, as you can assign the slider to adjust the volume of an entire ‘Sound Class’.
All of the sounds are in '2D space' except for the creaking sound when the wooden platform moves. This is attenuated in '3D space', so that you can only hear the sound when you are close to the moving platform.
Stage 12: User interface
The game has an extensive UI framework. There is a landing page with volume and resolution controls. There is also a pause and quit menu. There is an ever-present in-game HUD which is what displays the coin collection system, this is also what houses the animations to play when the orb flashes purple and the screen blurs when the player dies. It is disabled during the cinematics. All further UI overlays (such as information updates to the player) are individual ‘Widgets’ which are called via blueprints when required.
Unreal Engine has blueprint functions to set the game to paused, switch controls from UI controls to in-game controls and hide/show the mouse cursor. These tools simplify the process of transferring between playing the game and navigating the user interface enormously.
Stage 13: Playtesting, profiling & packaging
‘Playtesting’ is a very important part of the game production process and you will produce a list of bugs very quickly through iterative 'playtesting' of the game. I asked Simon to play the game and he pointed out that the ‘first time played’ is often the most important as it is the experience that most people will have of the game. I was pleasantly surprised with his comments that the game had a puzzle feel to it, although I felt I needed to move some of the interactions so that it became clearer to the player what it is that they are required to do to progress within the level.
Holding frame rate is also a very important part of the game production process, and Unreal Engine has a number of ‘Profiling’ tools built into it for you to be able to diagnose performance issues within your game. I had been developing the game on a GeForce RTX 2060 GPU holding a steady frame rate of 60FPS at 1920x1080 resolution until I enter the interior scenes when this was dropping as low as 25FPS.

Unreal Engine’s GPU Visualiser diagnoses the performance of your game and highlights the bottlenecks
Diagnosing the problem in the ‘GPU Visualiser’ told me that my two biggest performance hits were the lighting and ‘Raytracing’ in the interior scenes. I was able to make a 45% saving in performance cost by switching the reflections from the ‘Raytracing’ method to ‘Screen Space’ method, and also converting as many of the lights as is allowed by the engine into ‘Static’ as opposed to ‘Moveable’ or ‘Stationary’, thus ‘Baking’ the impact of the lighting into the level as opposed to changing dynamically in real time.
Whilst the ‘Packaging’ process is fairly simple in order to turn it into a windows executable file, I did have to diagnose and fix some small errors within the file structure when it was ‘Cooking’ by examining the console data.
Once this was done the project ran perfectly, with improved frame rates compared to running the game in the editor, and I was delighted to have created my very own shippable Unreal Engine product!
Visit chris.farkouh.net to learn more about Chris and his work across realtime 3D and virtual production.
Learn Unreal Engine from industry mentors!
CG Spectrum is an Unreal Academic Partner and Unreal Authorized Training Center. Our Unreal Engine courses are taught by industry veterans who provide personalized training and mentoring to help you create your own games. Explore our online courses and start your journey today!

Related Links